Bernard Embden's Jaguar Website
1978 Jaguar XJ-S
My name is Bernard Embden. Welcome to my Jaguar web site. The total web site consists of 83 links with close to 2000 photographs taken over the last 28 years. (You can see me physically age before your eyes (smile). This website is ongoing. It's purpose is to provide detailed information based on my personal experiences while working on, and modifying, an automobile that I have owned since 1980. No routine maintenance procedure is covered unless it differs from the Jaguar ROM. All links contain detailed photographs. Those of you with dial-up connections will experience some delay. In some cases, slow dial up connections might not load all links consistently.
When this website was started dial up connections were the norn. (smile)
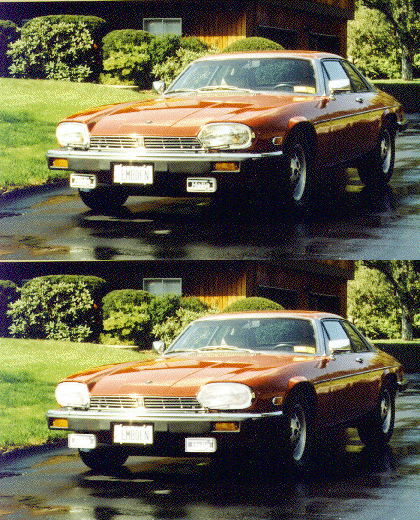
Below is a picture of my 1978 Jaguar XJ-S (with 69K miles). This photograph shows the addition of the later style (HE) bumpers, Euro headlights with wipers and starfish wheels. The car continues to evolve as seen in the photographs of this website.
I have photographs and procedures of my modifications and or solutions detailed in separate links below. Also included are current pictures of my car along with pictures of the person who has taken many of these photographs over many years. Her name is Samantha. (she is also my daughter).
If you are a Jaguar enthusiast, and own one of these fine automobiles/beasts, I encourage you to join a Jaguar XJ-S and V-12 engine discussion List. The list I recommend can be accessed at :
This lists provide the cumulative knowledge of all their list members, most of whom are knowledgeable helpful people.
Also recommended is downloading and reading Kirby Palm's book. This book chronicles the experiences and solutions (primarily from Jaguar and V-12 discussion lists) of Jaguar XJ-S and Jaguar V-12 engine owners worldwide. You can download his book at :
http://www.jag-lovers.org/xj-s/book/


In addressing the hot start problem that seem to plague almost all Pre-HE V-12 Jaguars, the single most important modification that I made was the fabrication of a redesigned fuel rail.
Note: this is a Pre-HE car. This modification does not apply to the later (HE) cars where Jaguar designed solutions to address this problem. Other modifications/solutions however, apply to any Jaguar XJ-S. If you are interested in my fuel rail fabrication, or any other of my modifications, please access the appropriate links.Picture of my redesigned Fuel Rail
Fabrication of redesigned Fuel Rail.
Installation of New Radiator and Drain Petcock.
Pictures of my 20 Year Old clogged up Radiator
Installation of Coolant Recovery System
Right angle speedometer gear elimination
Replacing the Fuel Injector Hoses
Replacing Rack and modifying Rack Bushings
Repairing Front Spring Support
Transmission Cooler & B&M Oil Pan Installation
Cam Tensioner Plug Replacement
Oil Banjo Bolt washers Replacement
Aluminum half-moon Seal and Valve Cover Gasket Install.
Ignition Amplifier Replacement
Bonding outside Rear View Mirrors
Timing Chain Tensioner Operation
Installing Stainless Steel Exhaust Tips.
Adjusting the Manifold Pressure Sensor.
Replacing A/C Compressor Rear "O" Rings
Installing a Parallel Flow Condenser
Installing Cold Air Intake System.
Installing Gear Reduction Starter
Rebuilding The Fuel Injector Harness
Installing a Fuel Injector Test Block
Replacing Front Crankshaft Seal
Replacing and Relocating the Alternator
Replacing and Upgrading the Brake Reservoir.
Adding Chrome To The Fuel Cooler.
Adjusting the Differential Pinion Pre-Load.
Relocating The Power Steering Cooler.
Removing the Front Suspension Cradle.
Replacing Bottom Engine Gaskets.
Replacing Front Suspension Mounts and Bushings.
Upgrading To An Electronic Speedometer.
Installing PCV Air/Oil Separator Filter.
Single Versus Dual Pass Radiator Decision.
Modifying the Transmission Mount.
Repairing The A/C Control Switch.
Replacing The AC Compressor Clutch.
Testing and Replacing the Throttle Switch.
Replacing The HVAC Blower Modules.
Activating The Fog Light Switch
Installing Manual HVAC Switches
Installing Fuel Pressure Gauge inside Engine